I plan to write a proper blog about it in the future with some PHP examples. In the meantime, here are conferences talks and webinar presentations that
]]>I plan to write a proper blog about it in the future with some PHP examples. In the meantime, here are conferences talks and webinar presentations that helped me structure my thoughts and my words on that topic as a preparation to my presentation.
Mastodon is a decentralised micro-blogging service which has gained lots of traction lately. Last week, I saw on Tidbits a couple of articles by Glenn Fleishman about Mastodon :
The first article is quite a
]]>Mastodon is a decentralised micro-blogging service which has gained lots of traction lately. Last week, I saw on Tidbits a couple of articles by Glenn Fleishman about Mastodon :
The first article is quite a good introduction for people who know centralized social networks (like Twitter or Facebook) and are savvy email users (as the analogy between Mastodon and email providers is very apt).
Tip: I think it's customary to write an introductory (pinned) post on Mastodon after having properly settled on a newly chosen instance (first time arrival or moved between instance), tagged with hashtag #introduction. I have yet to do mine, but it's on my TODO list...I reckon, for newcomers, the two pain points in getting into Mastodon are :
- How to choose a Mastodon instance to join in the first place
- How to follow someone by handle when they are on a different instance than yours which require some copy/paste as described in the article
For the first point, it might cause mental blocks, but knowing the following may alleviate that:
- You are not stuck forever with the instance you have chosen, you can migrate to another instance anytime and pretty seamlessly, and when you do so, you can take your followers list (and block list) with you
- There exists for newcomers easy-on-the-eye and nicely signposted curated and vetted lists of instances with details about the specifics of each that guide you in picking the instance that suit you the most (criteria being geography, interests, rules/codes of conduct). The official list from Mastodon is joinmastodon.org's server list, but there is another unofficial list at Fedi.garden that's popular too and seemingly equally curated. Picking an instance can thus become a deliberate, empowered activity rather than a chore.
Additionally, there is website called Fedi.tips, with extensive explanations, guidance and FAQ on Mastodon, it's a bit like the Hitchiker Guide to Mastodon.
Tip: Take the habits of boosting (Fediverse equivalent of retweeting) the posts you think are worth being in front of as many eyeballs as possible, because the federated nature of instances make it so that natural reach seems not optimal, and somehow boosting can get posts across more federated instances.
Regarding the second pain point, you could get used to it (I did), or use a browser extension for Firefox. I believe that extension exists for Chrome-based browsers as well. For mac users, there is also a Shortcuts-based method.
In any case, for me it's just a mild irritant rather than a real pain point. Adding followers is not what I do most on there, and also it's not systematic. I haven't quite pinpointed what magic rule make it so that sometimes I can see the profile of someone from another instance on a pane on my instance, and sometimes I'm taken to their instance when I click their avatar. It might be related to how well the other instance is federated with mine, but I'm not sure.
That said, those two points are some of the a-bit-too-salient features of the federated nature of Mastodon.
I guess another idiosyncrasy of Mastodon is its search functionality, which is a can of worm, I don't want to talk too much about this, especially as Tim Bray wrote enough on the topic.
Tip: If you are looking for a job or want to advertise a job, you can leverage the pervasive usage of hashtags on Mastodon, by tagging that type of post with the #GetFediHired tag.What about the Fediverse?
Wikipedia says:
The fediverse (a portmanteau of "federation" and "universe") is an ensemble of federated (i.e. interconnected) servers that are used for web publishing (i.e. social networking, microblogging, blogging, or websites) and file hosting, but which, while independently hosted, can communicate with each other. On different servers (technically instances), users can create so-called identities. These identities are able to communicate over the boundaries of the instances because the software running on the servers supports one or more communication protocols that follow an open standard.
I think this is where the analogy with how emails works starts to break down a bit, and that's what the second article from Tidbits is exploring and explaining.
The infographic included in the second Tidbits article is such a good overview of that network of services to the public, that I'll reproduce it here (I like my blog posts to be text only these days):
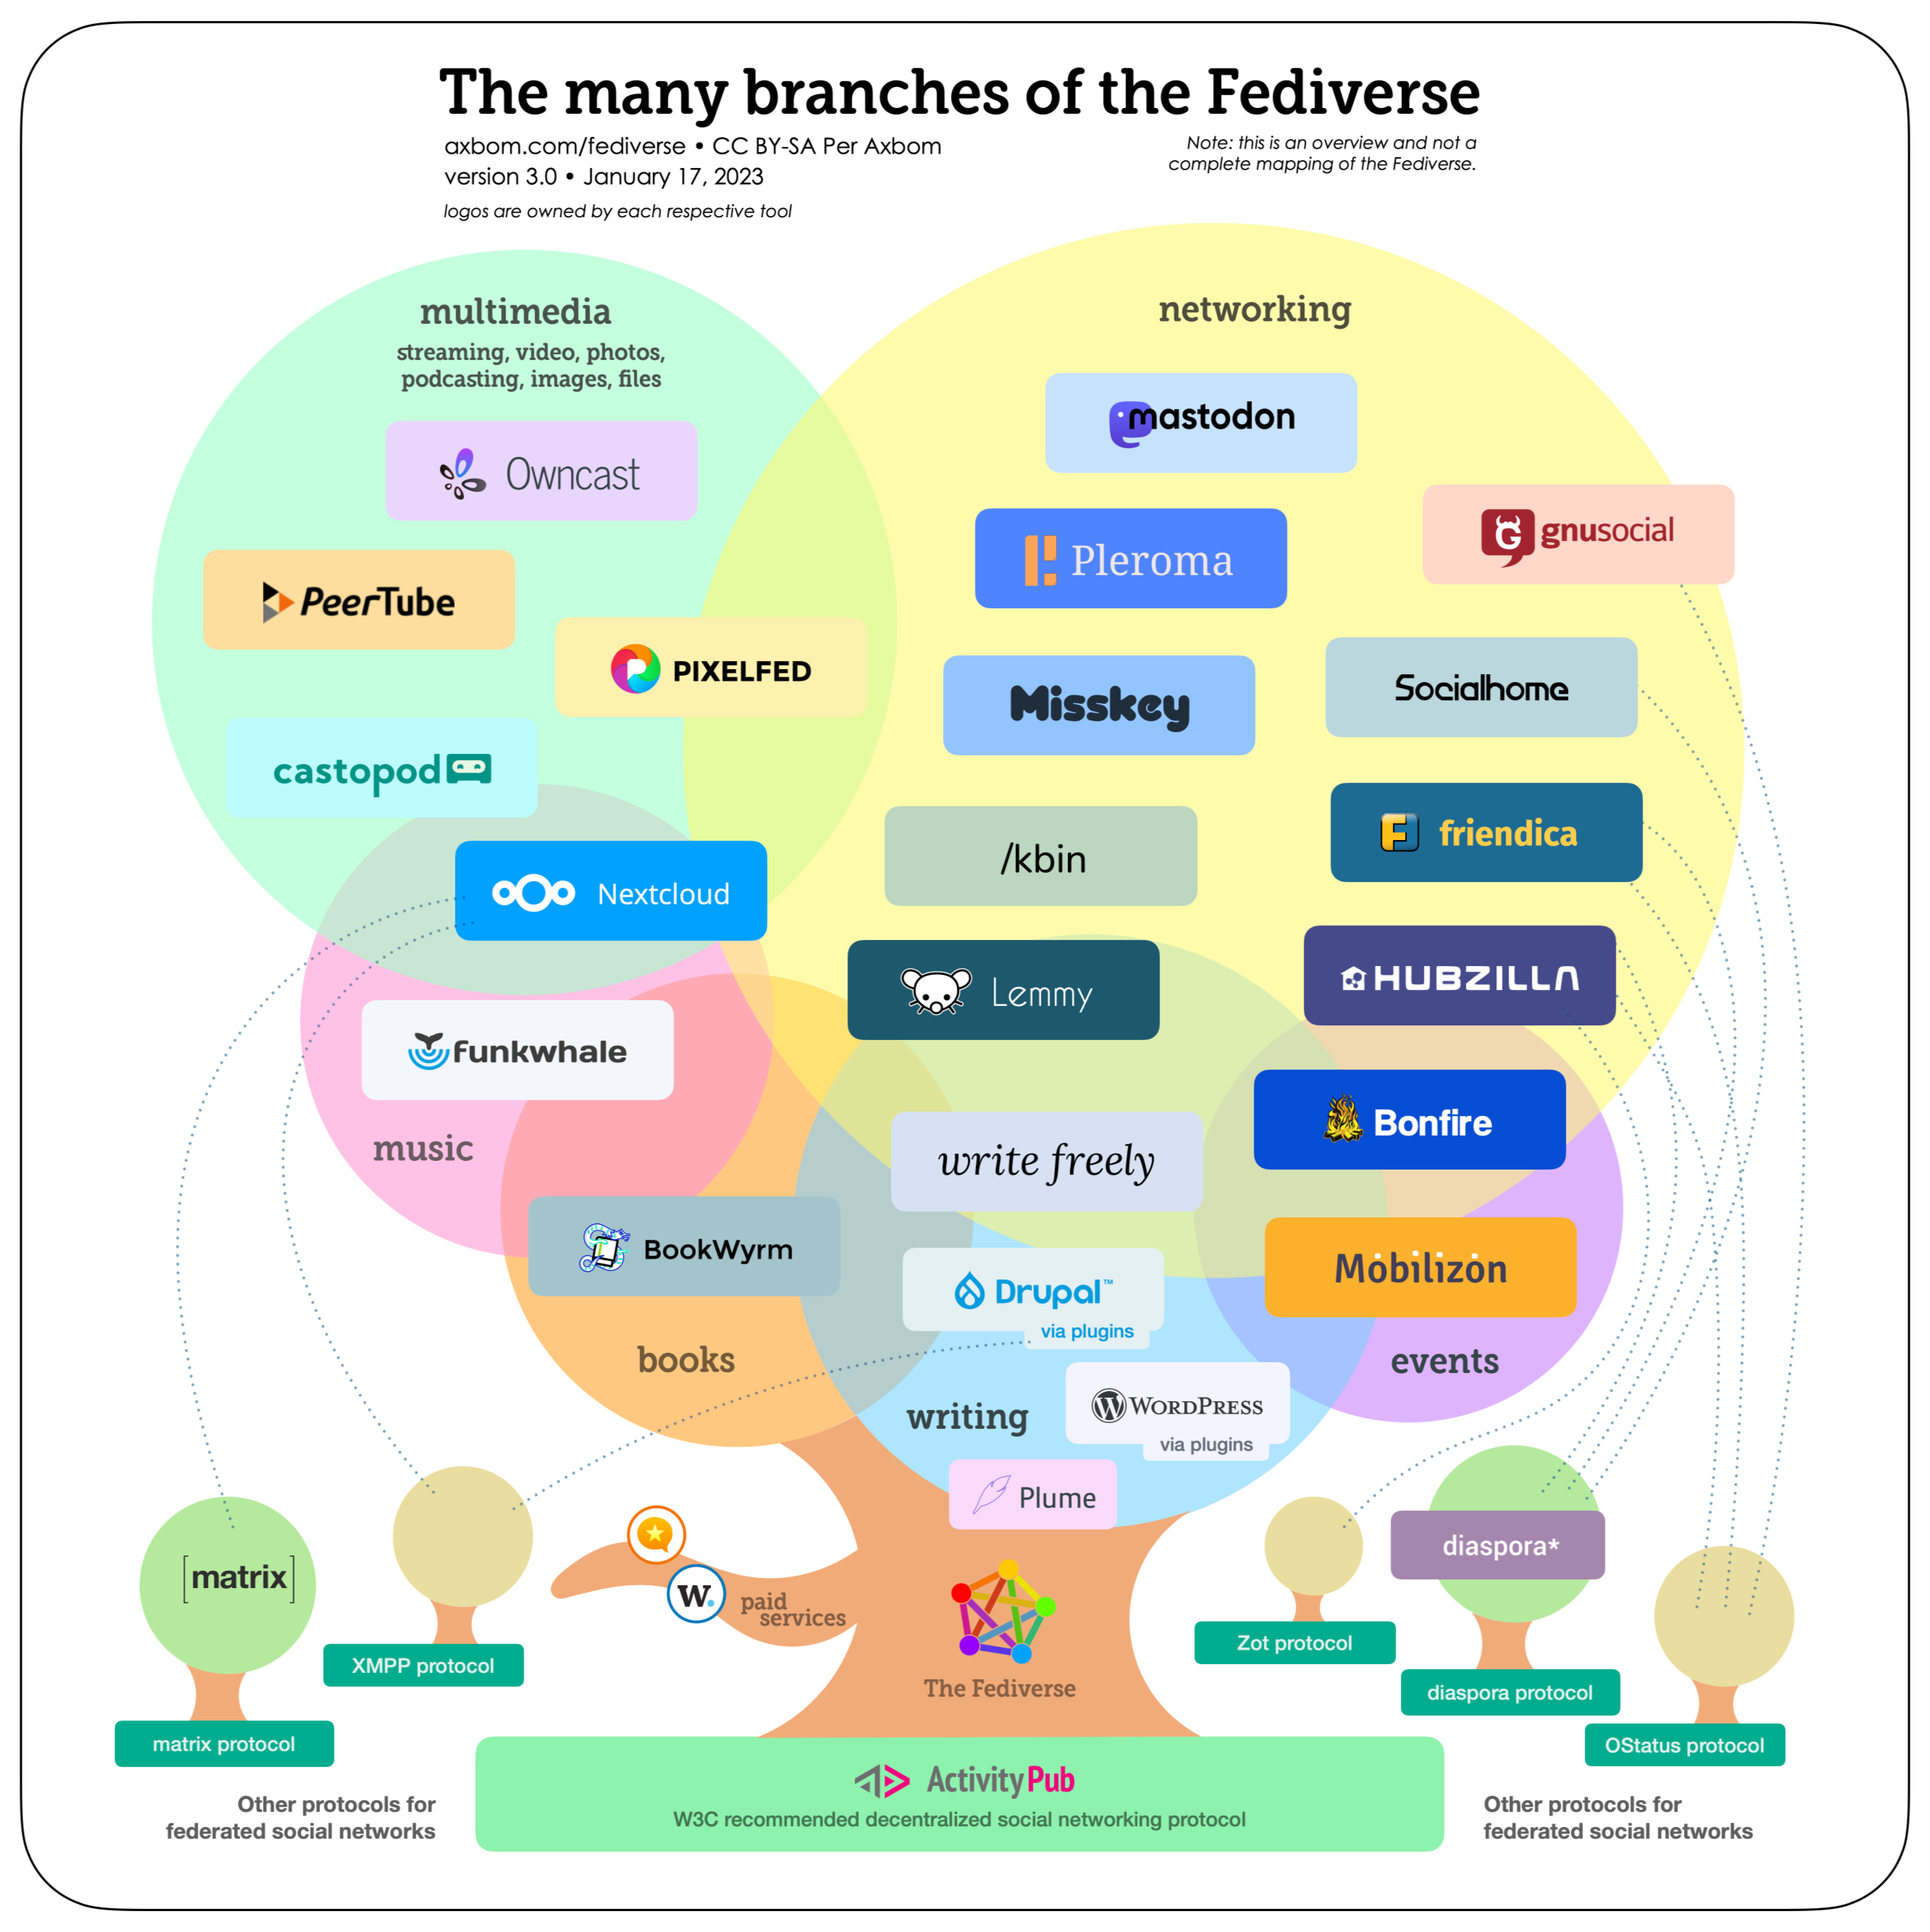
In practice, it means that not only you can interact with people on other Mastodon instances, but you can do the same with users of different services altogether.
For example, Pixelfed is a photo-sharing website, and from your instance of Mastodon you can follow someone's feed on Pixelfed without having to create an account there. It's like if you could follow someone's Instagram feed from your twitter feed! that's the power of a decentralised world. Instagram, Twitter and al, the are walled silos, feudal domains whose tech billionaire owner hoard and abuse your personal data like the yesteryear lords tax you to death.
Tip: Most admin of Mastodon instance are volunteer, they are doing hard work of moderating and face increasing cost of tech infrastructure. Some of them have setup fundraising and tip jar on Open collective, Patreon, ... Don't hesitate to contribute if you like the instance you've settled in.
Size-wise, the Fediverse is tiny compared to big social-media (there is this website trying to track the size of the Fediverse), but personally I like it that way. The fediverse feel more humane and approachable that way. There's no celebrities to stan, but I'm not that kind of person, and thankfully the Fediverse is not about that kind of usage for now.
I really like that the article spends some time talking about moderation in a decentralised ecosystem, and highlighting that the federated nature is both the strength and the weakness of those decentralized services. I watched an interesting video essay by Derek Caelin that dwell deeper on that topic, worth watching for its insights.
How do I relate to this all?
As for me, I am quite late to the game as I discovered Mastodon at the end of last year (Mastodon exists since 2016), like many people it seems, but unlike most, I'm not really a refugee: I have a Twitter account which I almost never use, so it is the buzz created by the change of ownership at Twitter and the subsequent migration of many people to Fediverse in general, and Mastodon in particular, that got me curious. I have vaguely heard of that thing, but from a distance and as some TODO item quite down in the list of things to explore. So I had a peek, I liked the village-y feel of it and some Mastodon functionalities (e.g: having both favourites and bookmarks) and community protocols (e.g: content warnings) are really neat and help improve the experience, so for that and other reasons, I'm now using it in earnest . Interestingly, it got me to blog more often too.
Regarding my Mastodon client of choice, I think I have quite an unpopular opinion. I have tried many apps on iPad and some on mac, and I disliked them all (including the official ones). I don't use Mastodon on my phone, because I don't do social media or gaming on the device I have most with me, because my time is way too precious...
So even good quality clients like Ivory are not for me. (there is even a debate about quality difference between Apple platforms and Android for Mastodon clients)
That said, I do like the website version of Mastodon very much (not sure it's full PWA, but I can still save it on my iPad's home screen): I like compartmentalising the view by setting up a column for each hashtag I like to follow, that's what works for me, and on the iPad (which is the device I use Mastodon the most with), it's a delight to use. I guess had the TweetDeck app had a Mastodon counterpart, that would have been the app closest to my way of functioning.
Tip: You can upload images to Mastodon, when doing so, the media editor will offer you the opportunity to add a caption (the field says Describe for the visually impaired. If doing so, you will make a lot of people who cannot see the media, very very happy, especially if you are going the extra mile of: not just plain description, but also add the feeling and/or the context . I have come across a few posts of visually impaired users who voiced their appreciation of the extra effort or got the post to trigger more conversations because of that.What's the next stop for me in my Fediverse exploration?
I was a heavy user of Meetup.com (both as organiser and participant) back in the days (before the last two years...), so I'm curious about their Fediverse alternative: Mobilizon and Bonfire.
Tip: I kept usingpostsin this blog. Actuallyposts(which aretweetsin Twitter) are calledtoots(orpouetsin French) in Mastodon. I'll get used to it...
Furthermore, it should be said that the infographic is not exhaustive, and the Fediverse is a very dynamic ecosystem with tons of projects happening. Lots of things to explore there. A couple of projects in there caught my attention not just because they exist, but because they are reminder of a situation that I feel impacted by as a developer: I'm talking about git forges, and how federation could break the monopolistic situation we are in, but that's another story for another day...
Finally, I must say I am pretty frustrated with the state of group chats these days, so slowly, but surely, the [matrix] is calling at me...
Wake up, Neo.
]]>Here is the code for our Gitter API client:
#!/usr/bin/env bash

source .env

curl -X POST -i -H "Content-Type: application/Here is the code for our Gitter API client:
#!/usr/bin/env bash

source .env

curl -X POST -i -H "Content-Type: application/json" -H "Accept: application/json" -H "Authorization: Bearer $GITTER_API_TOKEN" "https://api.gitter.im/v1/rooms/$GITTER_IT_NOTIFICATION_ROOM_ID/chatMessages"  -d '{"text":"Disk space usage requires attention on '"$DEPLOYMENT_TIER-$ENVIRONMENT"': '"$1"'%"}'
After perusing Matrix spec documentation, and looking into how projects like matrix.sh do it, I made the script below that should be good enough. I will test it when Gitter makes the new API available, but it already works on a test room on matrix.org home server.
#!/usr/bin/env bash

source .env

#!/usr/bin/env bash

transactionId=`date +%s`
url="/_matrix/client/r0/rooms/$MATRIX_ROOM_ID/send/m.room.message/$transactionId"
data='{"body": "Hello World !", "msgtype":"m.text"}'
curl -X PUT -i -H "Content-Type: application/json" -H "Authorization: Bearer $MATRIX_TOKEN" --data '{"body":"Disk space usage requires attention on '"$DEPLOYMENT_TIER-$ENVIRONMENT"': '"$1"'%","msgtype":"m.text"}' "${MATRIX_HOMESERVER}${url}"bats. Coming from a Perl background, It caught my attention due to its use of the TAP protocol (Test Anything Protocol). However
]]>bats. Coming from a Perl background, It caught my attention due to its use of the TAP protocol (Test Anything Protocol). However the opensource project didn't seem active and also my needs and attention have also shifted elsewhere.
Doing a similar search this week led me to a Stack Overflow answer that refered to a blog post:
and went on to mention that BATS has a maintained fork nowadays: bats-core
That's good news. The only things I need to find out now is how to export functions out of a bash script. Because my plan is to move the core functionality into a function, which I export into a wrapper script for normal operation, and into a test script so I can make test assertions using the aforementioned test framework.
This was answered on another Stack Overflow page, so that we can do something like this:
#!/usr/bin/env bash

do_stg {
...
}
#!/usr/bin/env bash

source ./core.sh

do_stg()#!/usr/bin/env bats
source ./core.sh
@test "can do something" {
result="$(do_stg())"
[ "$result" -eq ... ]
}Setup and real example
There are various ways to install bats-core in a project. On a mac, an easy way is using homebrew.
$ brew install bats-coreHere is something about a new project I'm working on: There is a bug, I created a GitHub issue for it, I have reproduced the bug locally, and then I wrote a test with bats-core:
#!/usr/bin/env bash

setup () {
	./preview 1> /dev/null 2> /dev/null
}

@test "link to homepage on other page is not empty" {
	link=$(docker-compose run --rm export sh -c "wget -qO- http://preview/404/" | grep "gh-head-logo" | cut -d"=" -f3)
	[[ $link =~ http://localhost:9999 ]]
}Then I run the suite:
$ bats tests
bug-19-homepage-link-empty.bats
 ✗ link to homepage on other page is not empty
   (in test file tests/bug-19-homepage-link-empty.bats, line 6)
     `[[ $link =~ http://localhost:9999 ]]' failed
   Creating ghost-ssg_export_run ...
   Creating ghost-ssg_export_run ... done
pages_repo_setup.bats
 - noop if local repo exists (skipped: wrong branch)

2 tests, 1 failure, 1 skipped
That's good, because TDD tells us that we should start with a failing test (it's actually red colored on my terminal). You can notice another test, pages_repo_setup.bats is present, which is a new test I created for another issue but I am on the wrong branch for it, since I'm focused on this bug, so I marked it to be skipped.
Then, after I've fixed the bug, I can run the test suite again:
$ bats tests
bug-19-homepage-link-empty.bats
 ✓ link to homepage on other page is not empty
pages_repo_setup.bats
 - noop if local repo exists (skipped: wrong branch)

2 tests, 0 failures, 1 skipped
Good, the test is now green!
Just so you get an idea how it works with a code organisation I sketched at the beginning, I'll show you the other test (the skipped one):
#!/usr/bin/env bats

source ./src/lib/repo_setup.sh

teardown () {
	if [ -f "tests/gitlab" ];then
		rmdir "tests/gitlab"
	fi
}

@test "noop if local repo exists" {
	skip "wrong branch"
	baseDir="tests"
	mkdir "$baseDir/gitlab"
	existingRemoteRepo="https://gitlab.com/user/myblog.git"
	create_dir_for_repo $baseDir $existingRemoteRepo
	[ $? -eq 0 ]

}
Here, the code being tested is the create_dir_for_repo() function defined in the file src/lib/repo_setup.sh which will be used in the main script too. You can also see from the two example test cases, that you have the traditional setup() and teardown() functions at your disposal, and from a cursory look at the documentation, I noticed other features that I'm used to see in test frameworks for "proper" programming languages.
Finally, here's a partial view on the directory strucure of the project:
├── src
│   └── lib
│       └── repo_setup.sh
├── stage
├── tests
│   ├── bug-19-homepage-link-empty.bats
│   └── pages_repo_setup.bats
├── up
├── versions
└── whatsup
The tests parameter that was passed to the bats command is the directory where the tests are located.
Finally, we look into setting up continuous integration for this project. Using GitLab as CI server, here's the configuration to get this working (notice how we use another method - NPM - to install bats-core):
image: docker:latest


services:
  - docker:dind

before_script:
  - apk add npm bash
  - npm install -g bats

test:
  script:
    - cp env-sample .env
    - cp config.production.json.sample config.production.json
    - ./up
    - bats tests
Then we can check the GitLab pipeline log:
...
$ bats tests
1..1
ok 1 link to homepage on other page is not empty
Cleaning up project directory and file based variables 00:00
Job succeededThe first part was about exporting and previewing, this part is about publishing
┌──────The first part was about exporting and previewing, this part is about publishing
┌──────────────────────────────┐                    ┌──────────────────────────────┐                        ┌──────────────────────────────┐                  ┌──────────────────────────────┐
│                              │                    │                              │                        │                              │                  │                              │
│                              │                    │                              │                        │                              │                  │                              │
│                              │    export          │                              │      preview           │                              │   git push       │                              │
│ Post editing and management  ├────────────────────► Static pages on file system   ├────────────────────────►Site served on local web server──────────────────►Site served on GitLab Pages   │
│                              │                    │                              │                        │                              │                  │                              │
│                              │                    │                              │                        │                              │                  │                              │
└──────────────────────────────┘                    └──────────────────────────────┘                        └──────────────────────────────┘                  └──────────────────────────────┘
Adding services to the Docker compose file
The part of the file that interest us is this:
  export:
    image: rija/gssg:20230124
    volumes:
      - "./site:/static"
    command: /usr/local/bin/gssg
    extra_hosts:
      - "localhost:172.31.238.10"
    networks:
      - app-net

  preview:
    image: nginx:1.23.3-alpine
    volumes:
      - ./site:/usr/share/nginx/html:ro
    ports:
- 9999:80We can't use the same export service to generate the static page suitable to be deployed to the destination hosting because all absolute URLs have been converted to relative-to-root ones. On the Internet, we want to keep the absolute URLs to improve SEO, se we add a new container services named publish with a different set of parameters:
  publish:
    image: rija/gssg:20230124
    volumes:
      - "./$PAGES_REPO_PATH/public:/static"
    command: /usr/local/bin/gssg --url $REMOTE_URL
    extra_hosts:
      - "localhost:172.31.238.10"
    networks:
      - app-net
The other difference is that the content exported for publishing is written to a different directory (inside a stage directory to distinguish from site) named after the hosting provider for convenience, that will be gitignored and in which we create the git repository of the remote hosting service, in my case GitLab.
Something else to note is the environment variable $PAGES_REPO_PATH, wich is stored in my .env file and its value in my case is stage/gitlab.
The publishing is based on a git repository that I clone locally (here, inside stage and named gitlab), add content to it, and then commit and push. [1]
The content of that repository will then be served as web pages by GitLab. The default address is something like <repository name>.gitlab.com, but one can associate its own domain name (and I did) to the GitLab pages [2].
This new container service can be invoked with the command:
docker-compose run --rm publishIn the previous instalment of this blog series, the command for theexportcontainer service had a different set of parameters than here. It was--ignore-absolute-paths --url $REMOTE_URL. I removed it completely because it caused a bug whereby the link to homepage on each post was incorrect when previewing. By removing all parameters, we leverage the fact that thegssgtool default tolocalhost:2368which suits our need for previewing.
Configuring the remote repository for static publishing
In order for GitLab to know what in the repository is public, I need to set up a configuration file inside that GitLab repo, named .gitlab-ci.yml, and with this content:
image: alpine:latest

pages:
  stage: deploy
  script:
  - echo 'Publishing'
  artifacts:
    paths:
    - public
  only:
  - master
Notice that the public term here is the same one as in the Docker compose file for the new publish container services:
- "./$PAGES_REPO_PATH/public:/static"So, one can change the directory name to something else, as long as the same name is used in both files.
The branch mentioned here (master) is the only branch on which the change will trigger the static publishing. That can also be configured to be a different branch, which is why I've stored that value in an environment variable $DEST_BRANCH in the bash script I talk about in the next section.
GitLab Pages, GitHub Pages, and BitBucket Pages are all services that can host static web pages and they work very similarly. This section about configuring remote repo for static publishing is actually the only step that differ between all those services.
Publishing the content and putting it all together
Since we are working with a git repository, after the static pages are generated in the correct location, we can use typical git workflow to publish them online:
cd stage/gitlab
git add -A
git commit -m "Update on the website at $(date)"
git push origin master
Make sure that the branch you push to is the same as the one configured in the previous section. For convenience, I have created a bash script publish that will take care of all the steps to publishing:
#!/usr/bin/env bash
set -ex
source .env

docker-compose run --rm publish

cd $PAGES_REPO_PATH
git add -A
git commit -m "Update on the website at $(date)"
git push origin $DEST_BRANCH
cd ..[1] https://docs.gitlab.com/ee/user/project/pages/getting_started/pages_from_scratch.html
[2] https://docs.gitlab.com/ee/user/project/pages/custom_domains_ssl_tls_certification/
]]>4 years ago, I have devised a Docker based pipeline for publishing static web pages from a local deployment of Ghost and publishing them to Gitlab using git.
I used Ghost 1.x, and the static page generator I used was a Python script that was an already abandoned
]]>4 years ago, I have devised a Docker based pipeline for publishing static web pages from a local deployment of Ghost and publishing them to Gitlab using git.
I used Ghost 1.x, and the static page generator I used was a Python script that was an already abandoned project on Github and designed to work on early versions of Ghost.
I kept a fork ot it, and I had to patch the script and around the script (my Python is not great) to get the whole thing working and do it again from time to time to keep it working.
However, I couldn't update Ghost as the python script would stop working with more recent version and I had one too many failure (the last straw), so I've decided to rebuild from scratch. I will keep Ghost as the centrepiece as the reason I liked it in the first place is still valid today: fantastic Markdown-based graphical user interface for writing posts, tag-based site organisation and very simple infrastructure and operation (no web server to hook - although I kept a basic one for local preview -, no relational database server - It used embedded SQLite3) and a properly marked up web output for published articles. There are evolutions in the blogosphere and in Ghost's business model, and I have discovered the Fediverse and the Gemini protocol, all that made me starting to investigate various options (I'll touch on this in Part 4 hopefully), but for now I am very happy with it.
I will keep the same workflow as in my old pipeline, but this introductory post will focus on the first two transitions for exporting Ghost's posts as static web pages and previewing it.
┌──────────────────────────────┐                    ┌──────────────────────────────┐                        ┌──────────────────────────────┐                  ┌──────────────────────────────┐
│                              │                    │                              │                        │                              │                  │                              │
│                              │                    │                              │                        │                              │                  │                              │
│                              │    export          │                              │      preview           │                              │   git push       │                              │
│ Post editing and management  ├────────────────────► Static pages on file system   ├────────────────────────►Site served on local web server──────────────────►Site served on GitLab Pages   │
│                              │                    │                              │                        │                              │                  │                              │
│                              │                    │                              │                        │                              │                  │                              │
└──────────────────────────────┘                    └──────────────────────────────┘                        └──────────────────────────────┘                  └──────────────────────────────┘
Ingredients:
- Sqlite3 (fast, lightweight, embedded SQL database engine)
- docker (Implementation of Linux containers with productive developer tooling)
- NodeJS (Javascript server)
- npm (Nodejs Package manager)
- ghost-static-static-generator, a.k.a gssg (a NPM package for generating static pages from a Ghost deployment)
- Nginx (Web server)
- wget (Web client)
- Ghost (A web-based commercial content publishing system for NodeJS with a free open-source self-hosted version)
Recipe:
Prepare the Dockerfile for the static page generator
I don't have to do this step and could use gssg directly on the computer.
However, using a Dockerfile for packaging all the Javascript allows me to minimize software dependencies installed on my computer that I would have to track manually otherwise. Also, it allows for running this setup on any system that can run docker or other compatible container technologies (more on this in Part 3).
FROM node:19-alpine

RUN apk add --no-cache npm wget && \
	npm i -g ghost-static-site-generator
Prepare the docker-compose file:
We will need three container services:
- editor: that's the Ghost web application
- export: that's the
gssgstatic site generator - preview: set up a web server pointing to the generated site for local previewing
services:
  editor:
    image: ghost:4.48.8-alpine
    volumes:
      - ./content:/var/lib/ghost/content
      - ./config.production.json:/var/lib/ghost/config.production.json
    ports:
- 2368:2368I picked Ghost 4.x over the latest Ghost 5.x because I want to use Sqlite3:
I dont' want to operate a client/server RDBMS (the MySQL option) and I dont' need it since I don't serve the web site from the Ghost webapp directly. Ghost 5.x only support MySQL while Ghost 4.x is the lastest to support the embedded Sqlite3 [1].
The volumes block is not strictly needed to get this workflow working, but it allows me to have the Ghost data and its configuration file outside of Docker so to be easily manageable (backup and further potential customisation).
  export:
    build: .
    volumes:
      - "./site:/static"
    command: /usr/local/bin/gssg --ignore-absolute-paths --url $REMOTE_URL
The variable $REMOTE_URL contains the public url of my blog. Docker expects it to be defined in an .env file sitting alongside the Docker compose file. The build: directive indicates that container service is using the default Docker file we have defined earlier. The command: line is the actual invocation of the static site generator. The --ignore-absolute-paths parameter tells gssg to make all links relative to the site root. In preview mode it allows to navigate to all pages locally instead of jumping to remote site when navigating to the aggregations pages (like tags). The volumes: block is the most important part, this is how we can retrieve the static pages that makes up our site on our computer in the site directory.
  preview:
    image: nginx:alpine
    volumes:
      - ./site:/usr/share/nginx/html:ro
    ports:
      - 9999:80
The preview container service allows me to navigate with my web browser to http://localhost:9999 and see the static version of the web site there.
gssg has an internal previewing mechanism that function on the same principle, but it required installing an additonal NPM package and I wasn't able to get it working within Docker context. The approached I've taken, based on the nginx web server is copied from my previous blog publishing pipeline (also Docker based) I've used for years and worked fine for my need.
Dealing with bugs in gssg
The premise of gssg is that it can generate static page from a local deployment of Ghost (reachable at https://pommetab.com), as well as from remote deployments. By default it expects a local deployment. In order to generate static pages for remote deployment of Ghost, one needs to use a --domain <url of remote Ghost deployment> parameter.
When using Docker, the hostname for the Ghost deployment in the Docker compose context is the container service name (in our case editor), and since we run gssg in the same context, we would need to specify --domain http://editor:2368 to the command otherwise it won't be able to connect to the webapp running as a container service.
The problem is that gssg has an issue whereby for some files (Site Maps XML files) it forgets to use the value of --domain and use https://pommetab.com instead which is probably hard-coded somewhere in the codebase.
To work around this issue, we add additional configuration directives to our container services so that:
editorcontainer is assigned a fixed IP address within the Docker networkexporthas an extra host mapping fromlocalhostto that IP address
Then we don't need to use --domain as gssg thinks it is dealing with a local deployment all the way.
This a known issue to the gssg developers and there is a Github ticket for it. [2]
With the above fix added, the full docker-compose.yml looks like this:
version: '3.7'

services:
  editor:
    image: ghost:4.48.8-alpine
    volumes:
      - ./content:/var/lib/ghost/content
      - ./config.production.json:/var/lib/ghost/config.production.json
    ports:
      - 2368:2368
    networks:
      app-net:
        ipv4_address: 172.31.238.10

  export:
    build: .
    volumes:
      - "./site:/static"
    command: /usr/local/bin/gssg --ignore-absolute-paths --url $REMOTE_URL
    extra_hosts:
      - "localhost:172.31.238.10"
    networks:
      - app-net

  preview:
    image: nginx:alpine
    volumes:
      - ./site:/usr/share/nginx/html:ro
    ports:
      - 9999:80

networks:
  app-net:
    driver: bridge
    ipam:
      driver: default
      config:
- subnet: 172.31.238.0/24Usage:
$ docker-compose build export
$ docker-compose up -d editor preview
$ docker-compose run --rm export
Conclusion
By now, I have a project where I can spin up a Ghost editor, write a blog post, then (re)generate the static version of the web site.
Provisional plan for follow-ups:
- Part 2: Publish the generated site to a staticpage-hosting forge (Github, Gitlab)
- Part 3: Deploy the setup on iPad using iSH
- Part 4: Thoughts on the state of blogging and future ideas
This post is my first one using the system described here. Until part 2 is done, I have to manually push the generated site to the last step of my old blogging pipeline.
[1] https://ghost.org/docs/update/
[2] https://github.com/Fried-Chicken/ghost-static-site-generator/issues/65
]]>So, in the previous two instalments [1] [2], I've wrangled together a basic echo server over TCP and UDP respectively. Before merging both code so we have a server that fully implement RFC 862, we need a wee bit of...
Refactoring
To explain the main motivation, we need
]]>So, in the previous two instalments [1] [2], I've wrangled together a basic echo server over TCP and UDP respectively. Before merging both code so we have a server that fully implement RFC 862, we need a wee bit of...
Refactoring
To explain the main motivation, we need to come back to an annoyance I've mentioned with the TCP server. It's the fact that stream_socket_* PHP functions require a resource type as first parameter and they cannot be used as native type hint value in PHP. So I had to wrap the usage of a socket in its own class to still be benefit of static type security on the high level functions I needed to write.
 final class Connection
    {
        /**
         * @param resource $stream
         */
        public function __construct(public readonly mixed $stream)
        {
            assert(is_resource($this->stream));
        }
    }
public function run(Connection $connection): void
        {
            while (!feof($connection->stream)) {
                $input = fread($connection->stream, self::READ_BUFFER);
                if ($input) {
                    fwrite($connection->stream, $input);
                }
            }
            fclose($connection->stream);
        }
So when I was reading PHP docs for socket_create [3] in the second installment when investigating working with UDP, the following snippets caught my attention:
| Version | Description |
|---|---|
| 8.0.0 | On success, this function returns a Socket instance now; previously, a resource was returned. |
and for socket_bind [4]:
| Version | Description |
|---|---|
| 8.0.0 | socket is a Socket instance now; previously, it was a resource. |
So it seems the lower level socket_* are doing away with resource, but the higher level stream_socket_* are not updated yet.
So I'm going to refactor the TCP implementation to use the socket_* set.
It allow us to get rid of the Connection class and use the same functions set as for the UDP implementation.
The core functionality (echo) is therefore changing from:
public function run(Connection $connection): void
        {
while (!feof($connection->stream)) {
                $input = fread($connection->stream, self::READ_BUFFER);
                if ($input) {
                    fwrite($connection->stream, $input);
                }
            }
            fclose($connection->stream);
to
public function run(Socket $connection): void
        {
            while ($input = socket_read($connection, self::READ_BUFFER)) {
                socket_write($connection, $input);
The sequence goes like this:
socket_createto create the socketsocket_bindto bind that socket to an address and portsocket_listenthat enable listening for incoming connectionssocket_acceptthat accept datasocket_readto read datasocket_writeto write datasocket_close
The last four are inside an infinite loop.
The last two loop over incoming data until EOF.
The full result of the refactoring can be seen below:
#!/usr/bin/env php
<?php

    declare(strict_types=1);

    error_reporting(E_ALL ^ E_WARNING);
    pcntl_async_signals(true);
    pcntl_signal(SIGINT, function () {
        echo Status::Stopped->value . PHP_EOL;
        exit(EXIT_OK);
    });
    const EXIT_WITH_ERROR = 1;
    const EXIT_OK = 0;

    enum Status: String
    {
        case Started = "Server has started. Press Ctrl-C to stop it.";
        case Stopped = "Server has stopped.";
        case TimeOut = "Time out, accepting connection again.";
        case Error = "Could not create a server socket. Exiting with error.";
    }

    interface Service
    {
        public function run(Socket $connection): void;
    }

    final class EchoService implements Service
    {
        public const READ_BUFFER = 4096;

        /**
         * Implement the echo functionality of writing to a socket what it read from it
         * @param Socket $connection
         * @return void
         */
        public function run(Socket $connection): void
        {
            while ($input = socket_read($connection, self::READ_BUFFER)) {
                socket_write($connection, $input);
            }
            socket_close($connection);
        }
    }

    final class TCPServer
    {
        /**
         * @param Socket $socket
         */
        private function __construct(public readonly Socket $socket)
        {
        }

        /**
         * Create and bind the socket
         * @param string $address
         * @param int $port
         * @return TCPServer
         */
        public static function create(string $address, int $port): TCPServer
        {
            if (! $socket = socket_create(AF_INET,SOCK_STREAM,SOL_TCP)) {
                echo Status::Error->value . PHP_EOL;
                exit(EXIT_WITH_ERROR);
            }
            if (! socket_bind($socket, $address,$port)) {
                echo Status::Error->value . PHP_EOL;
                exit(EXIT_WITH_ERROR);
            }
            echo Status::Started->value . PHP_EOL;
            return new self($socket);
        }

        /**
         * Listen to and continuously accept incoming connection
         * @param TCPServer $server
         * @param Service $service
         * @return void
         */
        public static function listen(TCPServer $server, Service $service): void
        {
            if (! socket_listen($server->socket,1)) {
                echo Status::Error->value . PHP_EOL;
                exit(EXIT_WITH_ERROR);
            }
            while (true) {
                while ($conn = socket_accept($server->socket)) {
                    $service->run($conn);
                }
                echo Status::TimeOut->value . PHP_EOL;
            }
        }
    }

    $server = TCPServer::create("0.0.0.0",7);
    TCPServer::listen($server, new EchoService());
[1] https://www.pommetab.com/2022/12/11/rfc/
[2] https://www.pommetab.com/2022/12/18/rfc-862-in-php-for-fun-part-2/
[3] https://www.php.net/manual/en/function.socket-create.php
[4] https://www.php.net/manual/en/function.socket-bind.php
In my previous post, I've implemented an echo server functioning with the TCP protocol. However the RFC indicates that echo should work with both TCP and UDP [1].
When I implemented the TCP version I consider two different sets of network functions in PHP. the stream_socket_* set
In my previous post, I've implemented an echo server functioning with the TCP protocol. However the RFC indicates that echo should work with both TCP and UDP [1].
When I implemented the TCP version I consider two different sets of network functions in PHP. the stream_socket_* set and the socket_* set.
I thought the former is higher-level abstraction of the latter set.
It's not the full story it turns out.
The doc [2] for socket_create() mentions this:
| Type | Description |
|---|---|
| SOCK_STREAM | Provides sequenced, reliable, full-duplex, connection-based byte streams. An out-of-band data transmission mechanism may be supported. The TCP protocol is based on this socket type. |
| SOCK_DGRAM | Supports datagrams (connectionless, unreliable messages of a fixed maximum length). The UDP protocol is based on this socket type. |
So it correct assumption within the scope of TCP connection.
But UDP is connection-less and datagram-based (that's the D in UDP), and thestream_socket_* functions don't seem the best fit anymore. Below is a code that does the job of implementing an echo server over UDP, using the socket_* PHP functions:
<?php
$server ="0.0.0.0";
$port = 7;
$socket = socket_create(AF_INET, SOCK_DGRAM, SOL_UDP);
socket_bind($socket, $server, $port);

while (true) {

    $receivedLength = socket_recvfrom($socket, $data,4096,0,$server,$port);
    if (false === $receivedLength ) {
        continue;
    }

    $outputlength = socket_sendto($socket, $data, $receivedLength, 0, $server, $port);
    echo "output length: $outputlength" . PHP_EOL;
}
socket_close($socket);
Running the server:
$ php udp_echo.php
Interacting with using netcat:
$ nc -uv 0.0.0.0 7
Connection to 0.0.0.0 port 7 [udp/echo] succeeded!
XXXXhello monde
hello monde
^C⏎
Something worth observing here is that netcat won't return.
The reason is that the UDP protocol, from the receiver point of view is to accept any packet that goes its way, in whatever order, whatever origin.
There's is no sense of "End of file" with UDP itself.
Typically, one would built a client that agree some kind of "end of transmission" character with the server so the client knows when it got everything and can close the connection. It's like building a protocol on top of UDP, which is what UDP is all about. [3]
With netcat, you can add a timeout to close the connection
$ nc -uv -w 5 0.0.0.0 7
Connection to 0.0.0.0 port 7 [udp/echo] succeeded!
XXXXhello monde
hello monde
Note: there are multiple versions of netcat, and the parameter for timeout may vary. Above is the macos version.
There is something else interesting with the code above. consider this client usage:
$ lorem -c 5000 | nc -u -w 5 0.0.0.0 7
Note: lorem is a CLI command that generate placeholder test of a user chosen number of characer (or line or paragrah). Here I input 5001 characters [4] to the echo server.
the output will be the 5001 characters piped in as input, despite the 4096 length passed to socket_recvfrom.
By tweaking the server code slightly:
$server ="0.0.0.0";
$port = 7;
$socket = socket_create(AF_INET, SOCK_DGRAM, SOL_UDP);
socket_bind($socket, $server, $port);

while (true) {

    $receivedLength = socket_recvfrom($socket, $data,4096,0,$server,$port);
    if (false === $receivedLength ) {
        continue;
    }

    $outputLength = socket_sendto($socket, $data, $receivedLength, 0, $server, $port);
    echo "output length: $outputLength" . PHP_EOL;
}
socket_close($socket);
when running the same example, we get this server output:
output length: 1024
output length: 1024
output length: 1024
output length: 1024
output length: 905
In one way, it's consistent with the fact that the UDP client just accept any packet addressed to it and we have an infinite loop in the server that keeps churning data. However, what's surprising is the value of 1024. We've specified 4096, why is it capped at 1024 ? I don't know.
To experiment further, I've replaced 4096 with 960, and the server output for the same example became:
output length: 960
output length: 960
output length: 960
output length: 960
output length: 905
Thats 4745 characters over 5 iterations.
this was confirmed by counting the nb of output character:
$ lorem -c 5000 | nc -u -w 5 0.0.0.0 7 | wc -c
4745
Updating the code to print out the value of $receivedLength shows no additional insight:
received length: 960
output length: 960
received length: 960
output length: 960
received length: 960
output length: 960
received length: 960
output length: 960
received length: 905
output length: 905
Setting its value to 1024 yields as server output:
received length: 1024
output length: 1024
received length: 1024
output length: 1024
received length: 1024
output length: 1024
received length: 1024
output length: 1024
received length: 905
output length: 905
while client output is:
$ lorem -c 5000 | nc -u -w 5 0.0.0.0 7 | wc -c
5001
To summarize, here are the questions still open so far:
- why is
socket_recvfromseemingly capped to 1024 bytes ? - why not all characters due to be output are sent back when I set the length to 960 bytes ?
To try to shed some light on what's wrong with my implementation, I wondered how is the echo server is implemented in UNIX/Linux system historically?
It turns out, it is a service provided by the super-server inetd.
And the source code is in the inetd.c file [5] which among other things, defines two functions echo_stream for TCP, and echo_dg for UDP. Here's the code for the latter:
/*
 * Internet services provided internally by inetd:
 */
#define	BUFSIZE	4096
[...]
void
echo_dg(int s, struct servtab *sep)
{
	char buffer[BUFSIZE];
	int i;
	socklen_t size;
	struct sockaddr_storage ss;

	size = sizeof(ss);
	if ((i = recvfrom(s, buffer, sizeof(buffer), 0,
	    (struct sockaddr *)&ss, &size)) < 0)
		return;
	if (dg_badinput((struct sockaddr *)&ss))
		return;
	(void) sendto(s, buffer, i, 0, (struct sockaddr *)&ss, size);
}
Not so different from our implementation after all!
There is no socket creation, nor infinite loop, but that's likely because inetd is performing those functions.
I noticed the buffer is also set to 4096 like in my original implementation.
Continuing my experimentation, keeping length set to 960:
$ lorem -c 10000 | nc -u -w 5 0.0.0.0 7 | wc -c
9425
$ lorem -c 5000 | nc -u -w 5 0.0.0.0 7 | wc -c
4745
$ lorem -c 1000 | nc -u -w 5 0.0.0.0 7 | wc -c
960
The last command's output seems to indicate that socket_recvfrom was called once and it read 960 bytes of data, then discarded the rest.
So what makes it that in the first two calls of that example, the server obviously calls socket_recvfrom multiple times?
So I ran one more experiment:
$ lorem -c 1920 | nc -u -w 5 0.0.0.0 7 | wc -c
1857
This time I've sent a multiple (2x) of the length (960).
And more characters were returned, not all, but it clearly called the PHP function twice.
Server output was:
received length: 960
output length: 960
received length: 897
output length: 897
When sending 2880 (960*3) characters, the server calls the PHP function 3 times:
received length: 960
output length: 960
received length: 960
output length: 960
received length: 833
output length: 833
I know UDP is considered not reliable (we use TCP if we want reliability), but still...
If I set the length to 1024 and send the same 2880 characters, I got all characters back and the server output is:
received length: 1024
output length: 1024
received length: 1024
output length: 1024
received length: 833
output length: 833
Ah! surely, that 833 that comes out again cannot be a coincidence!
Which gave me an idea for the next experiment.
First, set length to 960, but send a multiple of 1024, lets say 3072:
I only got 2881 character back and the server output is:
received length: 960
output length: 960
received length: 960
output length: 960
received length: 960
output length: 960
received length: 1
output length: 1
Then, I set length to 1024, and send 3072 characters:
I got all characters back and the server output is:
received length: 1024
output length: 1024
received length: 1024
output length: 1024
received length: 1024
output length: 1024
received length: 1
output length: 1
Yes, I'm starting to see what's happening here.
netcat (or actually is it the OS' network layer?) write our data into atmost 1024 bytes sized datagrams and send it asis to our server.
Our server receives the UDP packets but because the length to read is smaller than 1024, it reads 960 characters, discard the rest, and then move on to the next datagram, rinse and repeat. That's also why if the length is set to 4096, it will still read 1024 characters as that's the maximum size of datagrams.
That limit is call the Maximum Transmission Unit (MTU). It's 1500 by default on macos (so yes, it's an OS thing) [6]. That include the size of payload and of the header of the IP and UDP datagram, so in practice there's less for hte payload.[7]
Next installment, we will hopefully put together our echo server that work with both TCP and UDP.
[1] https://www.rfc-editor.org/rfc/rfc862
[2] https://www.php.net/manual/en/function.socket-create.php
[3] https://unix.stackexchange.com/a/482697/302549
[4]
$ lorem -c 5000 | wc -c
5001
[5] https://sources.debian.org/src/openbsd-inetd/0.20160825-4/inetd.c/
[6]
$ networksetup -getMTU en0
Active MTU: 1500 (Current Setting: 1500)
A self-contained server implementation in PHP (8.1) of RFC 862 (echo).
That old (1983) RFC describes an IP-based client-server application where the client sends data to the server, and the server returns the same data back to the client (hence the name "echo").
It used to be
A self-contained server implementation in PHP (8.1) of RFC 862 (echo).
That old (1983) RFC describes an IP-based client-server application where the client sends data to the server, and the server returns the same data back to the client (hence the name "echo").
It used to be used for networking testing, although nowadays we can use ping (ICMP) for that. The RFC mandates that the application should work over TCP and UDP (which are the transport layers on top of the IP layer).
In this first instalment, we are going to focus on the TCP implementation only. In PHP, there is high-level set of functions stream_socket_* we can use for that.
The sequence goes like this:
stream_socket_server()to create a socket to be used for the server sidestream_socket_accept()to accept incoming connection on the socket above- The function above has returned a resource we can call IO functions to read from (
fread()) - and to write to (
fwrite()) fclose()to close the resource after we've reached EOF (end-of-file)
We will be using the generic utility netcat as the client programm.
The code
#!/usr/bin/env php
<?php

    declare(strict_types=1);

    error_reporting(E_ALL ^ E_WARNING);
    pcntl_async_signals(true);
    pcntl_signal(SIGINT, function () {
        echo Status::Stopped->value . PHP_EOL;
        exit(EXIT_OK);
    });
    const EXIT_WITH_ERROR = 1;
    const EXIT_OK = 0;

    enum Status: String
    {
        case Started = "Server has started. Press Ctrl-C to stop it.";
        case Stopped = "Server has stopped.";
        case TimeOut = "Time out, accepting connection again.";
        case Error = "Could not create a server socket. Exiting with error.";
    }

    final class Connection
    {
        /**
         * @param resource $stream
         */
        public function __construct(public readonly mixed $stream)
        {
            assert(is_resource($this->stream));
        }
    }

    interface Service
    {
        public function run(Connection $connection): void;
    }

    final class EchoService implements Service
    {
        public const READ_BUFFER = 4096;

        public function run(Connection $connection): void
        {

            while (!feof($connection->stream)) {
                $input = fread($connection->stream, self::READ_BUFFER);
                if ($input) {
                    fwrite($connection->stream, $input);
                }
            }
            fclose($connection->stream);
        }
    }

    final class TCPServer
    {
        public const TIMEOUT = 60;

        /**
         * @param resource $socket
         */
        private function __construct(public readonly mixed $socket)
        {
        }

        public static function create(string $endpoint): TCPServer
        {
            if (! $socket = stream_socket_server($endpoint)) {
                echo Status::Error->value . PHP_EOL;
                exit(EXIT_WITH_ERROR);
            }
            echo Status::Started->value . PHP_EOL;
            return new self($socket);
        }

        public static function listen(TCPServer $server, Service $service): void
        {
            while (true) {
                while ($conn = stream_socket_accept($server->socket, self::TIMEOUT)) {
                    $service->run(new Connection($conn));
                }
                echo Status::TimeOut->value . PHP_EOL;
            }
        }
    }

    $server = TCPServer::create("0.0.0.0:7");
    TCPServer::listen($server, new EchoService());
Usage
- launch the server
$ ./echo.php
- You can use netcat to interact with it on another terminal:
$ echo "hello monde" | nc 0.0.0.0 7
There is just enough structure so I can copy reusable parts and make other toys in the same vein. Next iteration: Add support for UDP.
A limitation of this implementation at the moment is netcat doesn't always return if called interactively as it seems to wait for connection to close but the server doesn't always close. No such problem when piping in the text to echo as in my example above.
The way I work around it is to press [Ctrl-D] after I got my input back:
$ nc -v 0.0.0.0 7
Connection to 0.0.0.0 port 7 [tcp/echo] succeeded!
hello monde
hello monde
[Ctrl-D]
It works because [Ctrl+D] sends and EOF to stdin which is what the code above waits for to exit the loop:
while (!feof($connection->stream)) {
Another annoyance (from a code reading and type security perspective) is that stream_* function signature require sockets to be resource.
Since it's not a valid type, we need to use mixed type hint and augment it with PHPDoc annotation for static analysis. To keep the domain object clean, we wrap the socket in its own class (Connection).
On the day I posted my comments about the digital sobriety/software eco-design talk by Hélène MAITRE-MARCHOIS and Matthieu MARCHOIS at the Forum PHP 2022, John Gruber from Daring Fireball published a blog post relaying a new idea from Clive Thompson: The Maximum Viable Product, an
]]>On the day I posted my comments about the digital sobriety/software eco-design talk by Hélène MAITRE-MARCHOIS and Matthieu MARCHOIS at the Forum PHP 2022, John Gruber from Daring Fireball published a blog post relaying a new idea from Clive Thompson: The Maximum Viable Product, an idea that fits well with product design being the most impacting area of software development as detailed by the aforementioned speakers in their talk, even though it seems Clive Thompson is coming more from an angle of usablity rather than sustainability.
Minimum Viable Product” is a venerable Silicon Valley concept. It argues that if you’ve got an idea for an app, you should release it early — when it’s got barely just enough features to be useful. Sure, the app might only do one thing. But if it does that one thing well, get it out there.
[...]
The thing is, we can usefully flip this concept on its head!
What if more developers developed a sense for the “maximum” number of things a product should do — and stopped there?
What if more software firms decided, “Hey! We’ve reached the absolute perfect set of features. We’re done. This product is awesome. No need to keep on shoving in stuff nobody wants.”
Sure, this would have risks. Standing still risks becoming obsolete, as other competitors swoop in.
But it can also just mean you have confidence in your amazing design.
[...] One way to think of it is that software should be designed a little more like hardware. A 2022 MacBook doesn’t have any more buttons or ports than one from 20 years ago. (In fact, MacBooks have fewer ports.) It’s mostly software where there’s a temptation to keep expanding in scope endlessly.
This reminds me of a project I came across a few years ago called tiny apps.
It also reminds me of Gemini, an internet protocol, inspired by Gopher, that is designed to not be easily extensible to keep it simple.
At the Forum PHP 2022 conference held in Paris in mid-October, there was this very interesting talk -in French- on digital sobriety. The summary I took away is:
- Most of the pollution comes from manufacturing the terminals (do we need to change our smartphone every 2-3 years? can we build
At the Forum PHP 2022 conference held in Paris in mid-October, there was this very interesting talk -in French- on digital sobriety. The summary I took away is:
- Most of the pollution comes from manufacturing the terminals (do we need to change our smartphone every 2-3 years? can we build software that don't incite our users to upgrade their terminals?)
- We need to build software that are performant (not just fast, but also efficient). I then learnt that there is an ISO standard that covers that:
- They mentioned a best practices guide for software eco-design. It is only in French for now but there is a Github issue as a task for English translation. Also, I found it convenient that most of those practices seem to align well with regular good software engineering practices
- The bulk of the software environmental impact comes from the level of product design/feature bloat, so we should strive to always ask why a feature is requested, involve multiple parties to increase perspective during product development (including developers), use UX people to refine a requested user journey and trim feature requested by tiny fraction and could be done out of band may be, ensure users don't spend more time than necessary to get things done, don't hoard unecessary data.
Regarding the last point, since as developers we are used to the process of planning poker and associating complexity points to user stories for planned features, I'm thinking it might be a good idea to also start giving those stories an environmental impact score as part of the same process.
Sometimes complexity point may correlate to bloat, but it's not reliable way to assess environmental impact I reckon. There can be real complexity, or real unknowns to a story that says nothing about the energy use, bloat or wasted user time.
We probably need to come up with a more appropriate scale.
Probably not numerical carbon footprint, as it sounds hard to reason at the level of a user story during a planning poker.
The speakers mentioned a list of eco-benchmarks in their talk (apparently they seem to be very much work in progress). I haven't looked into them yet, but maybe a beginning of an answer can be found there.
Here are the list they shared:
I think EcoIndex and Carbonalyser also come as Firefox/Chrome extensions.
now, I'm off to test my websites against these auditing tools...
]]>Keeping my fork updated
last updated: 17th May 2022
Stage 0: git setup
Workflow assumptions:
- Upstream project in son Github
- The upstream project has a develop branch
- Developers contributes by forking the upstream project and create a feature branch
- Feature branches can be long lived
- I have no commit right
Keeping my fork updated
last updated: 17th May 2022
Stage 0: git setup
Workflow assumptions:
- Upstream project in son Github
- The upstream project has a develop branch
- Developers contributes by forking the upstream project and create a feature branch
- Feature branches can be long lived
- I have no commit right on any branch on the upstream project
- I forked the upstream form Github web interface
- I have clone my fork on my local development environment
- To submit my changes I create a Pull Request for the upstream develop branch.
- My local development environment is a macOS X system
enable git rerere
If the feature branch is long-lived, several rebase from develop may be needed.
Conflicts may emerge. If using rebase, where feature related changes are replayed,
these conflicts will keep re-occurring every time. Use git rerere to have git remember
how a conflict was solved the previous time it occured.
$ git config --global rerere.enabled true
add upstream remote
before adding upstream, the output of git remote -v may look like this
$ git remote -v
origin	https://github.com/rija/project.git (fetch)
origin	https://github.com/rija/project.git (push)
then add upstream remote:
$ git remote add upstream [email protected]:client/project.git
$ git remote -v
origin	https://github.com/rija/project.git (fetch)
origin	https://github.com/rija/project.git (push)
upstream	https://github.com/client/project.git (fetch)
upstream	https://github.com/client/project.git (push)
Stage 1: Update my develop branch from upstream's develop branch
$ git checkout develop
$ git fetch upstream
$ git rebase upstream/develop
$ git push origin
Stage 2: Update my feature branch from the develop branch
$ git checkout my-feature-branch
$ git fetch origin
$ git rebase develop
This will create a temporary branch made of the develop branch up to HEAD, then the changes from my-feature-branch will be replayed one by on top of that.
variation: rebasing on specific commit
Tto reduce the conflicts surface of the process, I often want to do the rebasing incrementally onto specific commits, so that the upstream changes I have to be conscious of when going through each conflict i kept manageable. The syntax is almost the same, instead of the develop branch, you indicate the first 8 digits of the commit ID for the commit on the develop branch onto which you want to rebase:
$ git rebase 6198c11
The above is saying "rebase my feature branch onto the develop branch at commit 6198c11"
Stage 3: Figuring what our position and what the current patch is for
once the process starts, git will shows a progress in real time:
...
Applying: Remove prototype code
Applying: Remove references to prototype in Dockerfile for nginx
Applying: Remove prototype step from Gitlab CI config
Applying: Fix dataset view acceptance tests for file table settings
...
Auto packing the repository in background for optimum performance.
See "git help gc" for manual housekeeping.
In theory if there's no conflicts that's the only thing you see.
On my long leaved branch (2000+ commits), there are always conflicts.
When the process encounters a snag, it will try to resolve it. If all strategies fail,
it will output the problem description and hand us the prompt to fix the conflict.
This is the right opportunity to gauge the situation with the following helpful commands:
git status: current state of files in the rebasing branchgit am --show-current-patch: Show the content of the patch that failsgit ls-files -u: See which files are in conflictsgit diff --diff-filter=U: See what are the conflicts
Sometimes the output of the second command can be confusing to read on the terminal, so I copy the commit id at the top of the patch and query GitHub for more readable details about the files and changes involved:
https://github.com/rija/gigadb-website/commit/ab0a7f836fbfd8381e2b8faba76984c6e042af09
Stage 4: Manually resolving conflicts
See which files are in conflicts:
$ git ls-files -u
100644 9b42055da84e099659ee6246fb9f5bdb1f034de6 2	tests/behat.yml
100644 d1a9a1ebbe16aa2f7f57c23b4fd57ec906446aa7 3	tests/behat.yml
See what are the conflicts
$ git diff --diff-filter=U
diff --cc tests/behat.yml
index 9b42055d,d1a9a1eb..00000000
--- a/tests/behat.yml
+++ b/tests/behat.yml
@@@ -3,7 -3,7 +3,11 @@@ default
      features:  features
      bootstrap: features/bootstrap
    context:
++<<<<<<< HEAD
 +      class:  'MyMainContext'
++=======
+       class:  'AuthorWorkflowContext'
++>>>>>>> Author-names (#81): setting up test infrastructure
    extensions:
      Behat\MinkExtension\Extension:
        base_url: 'http://lvh.me:9170/'
The number :2 or :3 from the output of git ls-files -u represent the branch identifier. There is sometimes a :1 too.
They can be labelled as ours, theirs and HEAD. (But the mapping order differs depending on the merging method used and whether your workflow differs from what's described in Stage 0).
To show the conflicted files from those three branches without checkout:
$ git show :2:tests/behat.yml
$ git show :3:tests/behat.yml
Fixing the conflict
In case where the fix is about accepting one of those 3 versions, here is how you accept a version and move on.
(Let's say we want to accept the version from :2)
$ git show :2:tests/behat.yml > tests/behat.yml
$ git add tests/behat.yml
(there's a quicker way of doing the same thing shown below in "Patterns of conflicts" using git checkout)
If the fix is not that simple, investigate what correction are necessary and then use git add to signal conflict resolution.
git rebase --skip or git rebase --continue ?
This depend on whether the replaying patch needs to be applied or not once the fix has been made.
The conflicting patch can be consulted in .git/rebase-apply/patch
If the patch still matters, use git rebase --continue
If the fix makes the patch redundant, use git rebase --skip
If the conflicted merge involve debugging changes (e.g: as part of investigating issues on CI) that you know won't matter further down the line of commits to replay, they can be skipped.
Patterns of conflicts
If you repeatedly rebase a long-running branch, you will soon notices patterns for conflicts, with some of them having repeatable resolution. Here are a couple for which the resolution, although manual, can be systemised provided you have a grasp fo the upstream changes made since fork/last rebase (helped by using git rebase <commit id>).
1. You know feature branch changes for all conflicted files are the right version to keep
$ git diff --name-only --diff-filter=U | grep protected | xargs git checkout --theirs
$ git diff --name-only --diff-filter=U | xargs git add
$ git rebase --continue
2. You know upstream changes for all conflicted files are the right version to keep
$ git --rebase skip
3. Keep some files from the upstream branch and others from feature branch
$ git ls-files -u
$ git checkout --theirs <list of conflicted files to checkout from feature branch>
$ git checkout --ours <list of conflicted files to checkout from upstream branch>
$ git diff --name-only --diff-filter=U | xargs git add
$ git rebase --continue
Stage 5: What if things go wrong
git rebase --abort will cancel the rebase as if it was never attempted.
however, all already resolved conflicts will be cancelled too, that's why it's better to rebase onto a commit id rather than a branch, so that you can take in upstream changes in smaller chunks iteratively. That way, if you have to abort, not much conflicts resolution work is lost.
Sometimes I had to use git rebase --quit, when git crashes.
Stage 6: Finalising the rebase
At the end, when the rebase complete, I normally configure the project and run all the tests.
Only when that's done and working I run:
$ git push origin
will fail with the error:
error: failed to push some refs to '[email protected]:rija/gigadb-website.git'
hint: Updates were rejected because the tip of your current branch is behind
hint: its remote counterpart. Integrate the remote changes (e.g.
hint: 'git pull ...') before pushing again.
hint: See the 'Note about fast-forwards' in 'git push --help' for details.
DO NOT follow the advice from these hints, otherwise we will end up with duplicate commits for the changes made in the feature branch.
This is because the rebasing process has given new commit ids to the feature branch commits that follows the commit upon which the rebase was made.
Therefore, the git remote server see them as distinct commits and cannot connect them with the old commits.
Instead we do a force commit to replace the remote with the rebasing branch:
$ git push --force origin
Warning: Replacing the remote branch that way is highly unadvisable on branch that have been exposed to other developers. In this case, as per the workflow scenario in Stage 0, it's not a problem as each developer fork the upstream project for its own feature and do not share that fork directly. Instead the fork is merged through a pull request into a develop branch (or a reviewer branch).
What if the feature branch is too big and its review by the maintainers becomes difficult?
An approach I like to use is to identify and pick set of files from my feature branch and move them into a new branch rebased onto the upstream branch. That way, I can submit PR for the smaller branch, and keep on doing that until merging the feature branch becomes formality.
- Checkout your feature branch
$ git checkout epic-work
-
Rebase it onto upstream's tip commit (let's call that commit
61f0b29) following (or not) the notes from this document -
Create a branch from there
$ git checkout -b smaller-subset
- And rebase onto the latest commit on upstream branch before you branched out
$ git reset --mixed 61f0b29
- All the changes you have made in
epic-workare now local changes. you can pick the files you want to be part ofsmaller-subsetby staging and committing them, and then discard all the unstaged files:
$ git add selected_file.txt selected_dir some_dir/another_file.php
$ git commit -m "smaller set of changes to merge together"
$ git push --set-upstream origin smaller-subset
$ git restore .
How to reset local branch to be the same as its remote counterpart
$ git branch
* my-work 1734edbaf [origin/my-work] W...
  develop             575c54e30 [origin/develop] Fix(DatasetViewTest): C...
$ git fetch origin
$ git reset --hard origin/my-work
how to remove the last n local commits
$ git reset --hard HEAD~n
$ git push --force origin
Use a file from another branch
$ git checkout <name of another branch> -- <file of interest>
Resources
- https://stackoverflow.com/questions/9264314/git-commits-are-duplicated-in-the-same-branch-after-doing-a-rebase
- https://stackoverflow.com/questions/23207791/git-rebase-conflict-who-is-head
- https://stackoverflow.com/questions/2945344/how-do-i-select-a-merge-strategy-for-a-git-rebase
- https://stackoverflow.com/questions/215718/how-can-i-reset-or-revert-a-file-to-a-specific-revision
- https://stackoverflow.com/questions/52704/how-do-i-discard-unstaged-changes-in-git
- https://stackoverflow.com/questions/63188678/how-do-i-make-a-pr-from-a-forked-repo-for-only-certain-files-but-all-commits-o
Useful tools
- Sublime Merge: my preferred GUI for git. It's exhaustive and I use it for branch management and tracking, files and lines history, and for staging changes a the level of hunks inside files
- FileMerge (part of Apple XCode tools): I use it to to diff compare directories between the rebased branch and a checkout of before the rebasing
XML-RPC is for sure one of the two Achille's heels of Wordpress.
It is a notorious target for hackers who like to do one of these three things or a combination of them all with the xmlrpc.php script:
- DOSing your website
- Using your website to stage a
XML-RPC is for sure one of the two Achille's heels of Wordpress.
It is a notorious target for hackers who like to do one of these three things or a combination of them all with the xmlrpc.php script:
- DOSing your website
- Using your website to stage a DDOS on someone else's website
- Try to gather more information about your website for further hacking
It's a very well known problem, and the web is full of blogs and forum posts stating that the best course of action is to shut of that endpoint completely.
Different people goes about different ways to do that, but if your Wordpress run behind a Nginx web server, the most common solution I've seen is to add the following restriction in the configuration of the web server
location = /xmlrpc.php {
	deny all;
	access_log off;
	log_not_found off;
}
If you were to hit the xmlrpc.php endpoint on the server with the above configuration you will get a 403 HTTP Error response.
Another way of turning the XML-RPC interface is to add the following filter to Wordpress
add_filter( 'xmlrpc_enabled', '__return_false' );
Apparently it has the advantage of allowing Automatic's Jetpack plugin to still work which I cannot verify as I'm not using that plugin on my websites.
However, what happen when you actually need to use that endpoint, either because your client want to be able to access the website from his smartphone app or there is a requirement to integrate Wordpress with automation services like Zapier.
It may be interesting to have a look at what XML-RPC do and how it works.
Clients POST an xml document to the endpoint that contains a method and parameters
<?xml version="1.0"?>
<methodCall>
    <methodName>system.listMethods</methodName>
    <params>
        <param>
            <value>
                <string/>
            </value>
        </param>
    </params>
</methodCall>
and the endpoint return an XML response in case of success
HTTP/1.1 200 OK
<?xml version="1.0" encoding="UTF-8"?>
<methodResponse>
    <params>
        <param>
            <value>
                <array>
                    <data>
                        <value>
                            <string>system.multicall</string>
                        </value>
                        <value>
                            <string>system.listMethods</string>
                        </value>
                        <value>
                            <string>system.getCapabilities</string>
                        </value>
                        <value>
                            <string>demo.addTwoNumbers</string>
                        </value>
                        <value>
                            <string>demo.sayHello</string>
                        </value>
                        <value>
...
On this page, you can see all the methods Wordpress accepts.
Strategy 1: unset risky methods
To this day, there seems to be three of them that have been exploited for nefarious purposes, and one strategy then is to deactivate these methods from the XML-RPC interface.
you can do so with another Wordpress filter
add_filter( 'xmlrpc_methods', 'unset_risky_methods' );

function unset_risky_methods( $methods ) {
  unset( $methods['pingback.ping'] );
  unset( $methods['pingback.extensions.getPingbacks'] );
  unset( $methods['wp.getUsersBlogs'] );
  return $methods;
}
There is actually a Wordpress plugin that will implements the code above.
However that doesn't stop bots to continue hammering your XML-RPC (in particular there's a fake Google Bot that like to POST data to Wordpress websites XML-RPC endpoints).
Also you have to maintain awareness of new methods that can hackers can exploits.
It's still a good first step as it reduces the attack surface.
Strategy 2: IP whitelisting
Another approach is to whitelist the services you want to communicate with, which is easier said than done.
The reason is because the services we are likely to interface with are massively scalable and their range of IPs is large and likely to change from time to time.
So at some point when I needed to use Jetpack, the Nginx restriction block using that strategy looked like:
location = /xmlrpc.php {
        # Automattic's netblocks
        allow 216.151.209.64/26;
        allow 66.135.48.128/25;
        allow 69.174.248.128/25;
        allow 76.74.255.0/25;
        allow 216.151.210.0/25;
        allow 76.74.248.128/25;
        allow 76.74.254.0/25;
        allow 207.198.112.0/23;
        allow 207.198.101.0/25;
        allow 198.181.116.0/22;
        allow 192.0.64.0/18;
        allow 66.155.8.0/22;
        allow 66.155.38.0/24;
        allow 72.233.119.192/26;
        allow 209.15.21.0/24;
        deny all;
}
However I'll have to be aware those IPs may change.
This github ticket is where I sourced the list and it has some additional explanation.
If I were to integrate with Zapier, I'd have to add the whole list of AWS IP addresses.
If my client who wants to update the Wordpress website from her mobile app has the habit of working from various public wifi hotspots, it's going to be hard to pin and IP address to white list
Strategy 3: IP blacklisting
Another approach is to black list IP addresses from where malicious activities originate.
How do we know them ? by looking at our server logs
185.81.157.204 - - [19/Aug/2016:12:42:39 +0000] "POST /xmlrpc.php HTTP/1.1" 301 184 "-" "Googlebot/2.1 (+http://www.google.com/bot.html)"
or
52.18.74.217 - - [25/Apr/2016:09:28:25 +0000] "GET /xmlrpc.php HTTP/1.1" 403 135 "-" "-"
so these IPs can be blacklisted
location  /xmlrpc.php {
        allow all;
        deny 185.81.157.204;
        deny 52.18.74.217;
}
The trouble with such approach is that IPs change and new actors pop up every time so you need to scour your logs fairly regularly to catch any new dodgy IPs.
There is a slight potential for collateral damage too as the IP may be shared with many users, not all of them bent on ill-intent.
This approach, nonetheless, have the potential advantage of a good balance between usability, security and resource frugality: It doesn't reduce usability blocking the service our web service need to access to while allowing us to identify and keep at bay bad actors.
If only there was an easy way to scour the log for malicious activities (repeated login attempt, dosing the xml-rpc interface, comment spam,...) and prevent the connection to happen automatically...
It just happens that there is such a tool, it's called Fail2Ban.
And there's a Fail2Ban Wordpress plugin to make its use even easier.
Strategy 4: Throttling
Usually the symptom of many of these attack is degradation of performance of the server as bots keep hitting on the XML-RPC interface.
So you can configure rate limit to prevent large amount of short-repeated, concurrent requests.
In the context of Wordpress running with Nginx and php-fpm, I found this article very helpful for setting up such configuration.
You can achieve similar effect by using services like Cloudflare.
Final words
I wrote this article to document the process I'm going through for my current and next Wordpress projects with relation to web security.
There's no silver bullet, but a combination of removal of unnecessary methods, throttling and IP blacklisting are what work for my current use cases.
Next on that topic, I might write a post about Fail2ban, its use with Wordpress and Nginx and its deployment in the context of containers.
]]>2016:
2013:
in one word, straightforward.
I used this NPM package: OGhost
The only hiccup, was the out of memory error that caused the import to fail.
My Node.Js app was running with 128MB. I've increase memory allocation on Bluemix to 256MB, and the import went smoothly.
I found
]]>in one word, straightforward.
I used this NPM package: OGhost
The only hiccup, was the out of memory error that caused the import to fail.
My Node.Js app was running with 128MB. I've increase memory allocation on Bluemix to 256MB, and the import went smoothly.
I found it funny to have migrated my 10 years old blog from Octopress on Heroku (set up that way 3 years ago when I was still a ruby developer) to Ghost on Bluemix, as I'm getting more and more into Node.js.
And this blog started as a Wordpress blog (but I still do a lot of Wordpress/PHP development).
]]>